26/10/2014

Film Room Project: Sin City start to finish

So the week is over and so if the film room project, it has been a fun and stressful learning experience and I am definitely looking forward to doing more group work later down the line. Right so lets get to it and look over the whole project start to finish; from failure to success.

Day one; moodboards. Our group looked through thousands of films and TV shows looking for interesting and moody scenes with fancy lighting; we came across films like Scarface; looking at his office, Prometheus; with its intriguing colourful neon lighting and Interview with the vampire; lit so beautifully with candles giving it a warm and sickly redy brown palette

But when it came to our first presentation be decided to go with the film Spirited away; we were going to jazz it up a bit and use artistic licensing to make it look even better. We chose the Bathing quarters, in this scene we were going to include an onsen which had light rays beaming onto its water; the addition of a circular window with the use of animated textures for the water and particle effects for steam the scene was going to show off all of UE4's cool features. However we were soon shot down by the tutors and told to go a completely different root. So we decided to go back to the drawing board and look for more visually striking shots.

After a couple days we came up with new films such as; I,Frankenstein, Hell Boy, Sin City, Oz the great and powerful, Alice in wonderland, Harry Potter and The man with the iron fist. On our second presentation we laid out all of our cards and let the tutors decide which idea was the most visually appealing. The feedback we got swayed us to go with Sin City, later that night we went through the entire series of screen caps for the film and chose our favourites. I then went through all of them and decided which were my favourites, then analysed them until I had a final 2; this then lead me to list the pros and cons of both scenes leaving me with my final result, Marv's bedroom.


After deciding on the scene we went through and assigned assets and created a workflow chart to make sure everyone was on track and that we would finish on time. We also looked at more shots of the room to look at the objects in more depth. We found a few contingencies and that the room was completely skewed due to most objects being put in in post production.

Next on the list of things to do was concepting I didn't spend a lot of time concepting and only did this for the plane due to it not being a main priority due to time constraints.

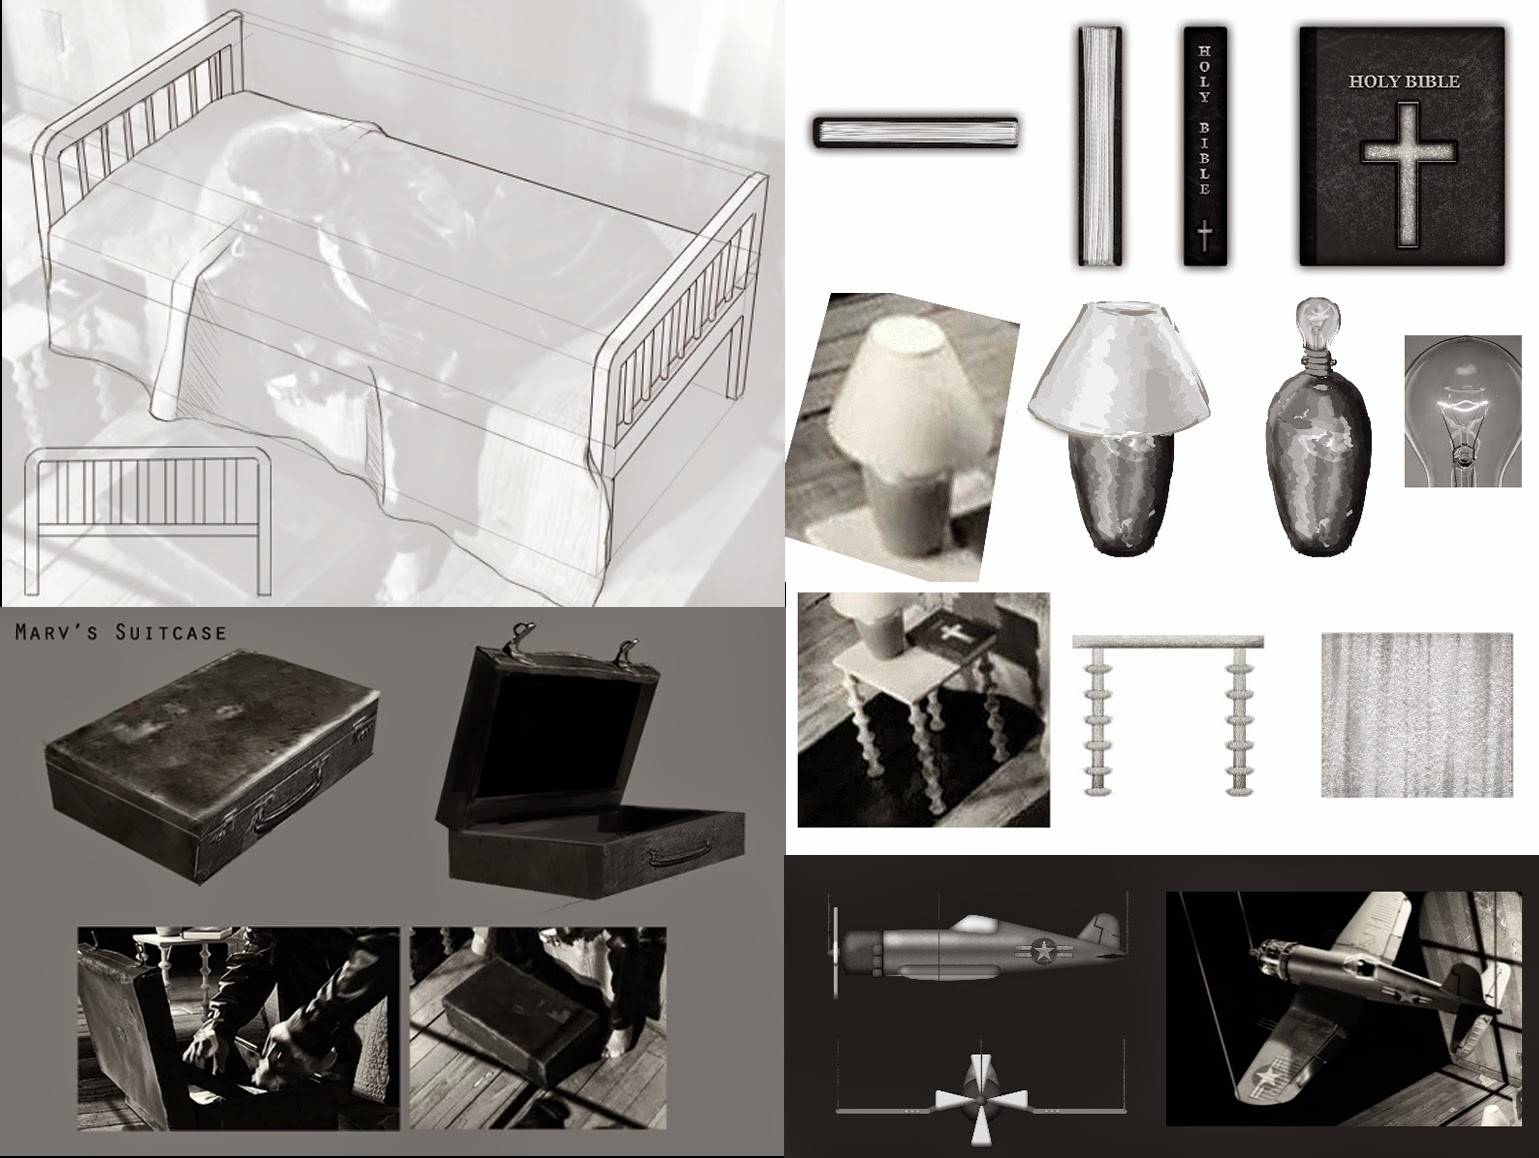
After concepting I got straight into modelling using the base block out one of my team mates made. When making this perspective scene we had to fit the scene perfectly therefore a lot of the objects are warped. 

With my plane I had to restart it; at first I was using no reference but the film shot, so after restarting I decided to do some research and find some pictures of the same model of plane and worked around that. With my boots I decided to get reference when I started and they worked out well. The suitcase was also altered so that the geometry that wasn't seen was deleted. After making the assets I then had to skew them slightly and mess around with the geometry to get it to line up with the scene. After all of us had finished our models we did some quick lighting tests to see if all the smoothing groups were correct and to see if it looked accurate to the original image.

Since the scene looked good and all our models were critiqued and fixed we moved on to unwrapping; we also created light maps in max at this time so that when it came to importing the meshes into UE4 they would light correctly. After unwrapping I moved onto texturing the boots and the bed. At first we were going to have large textures for everything but after some thought we changed them to low res for good practice. 

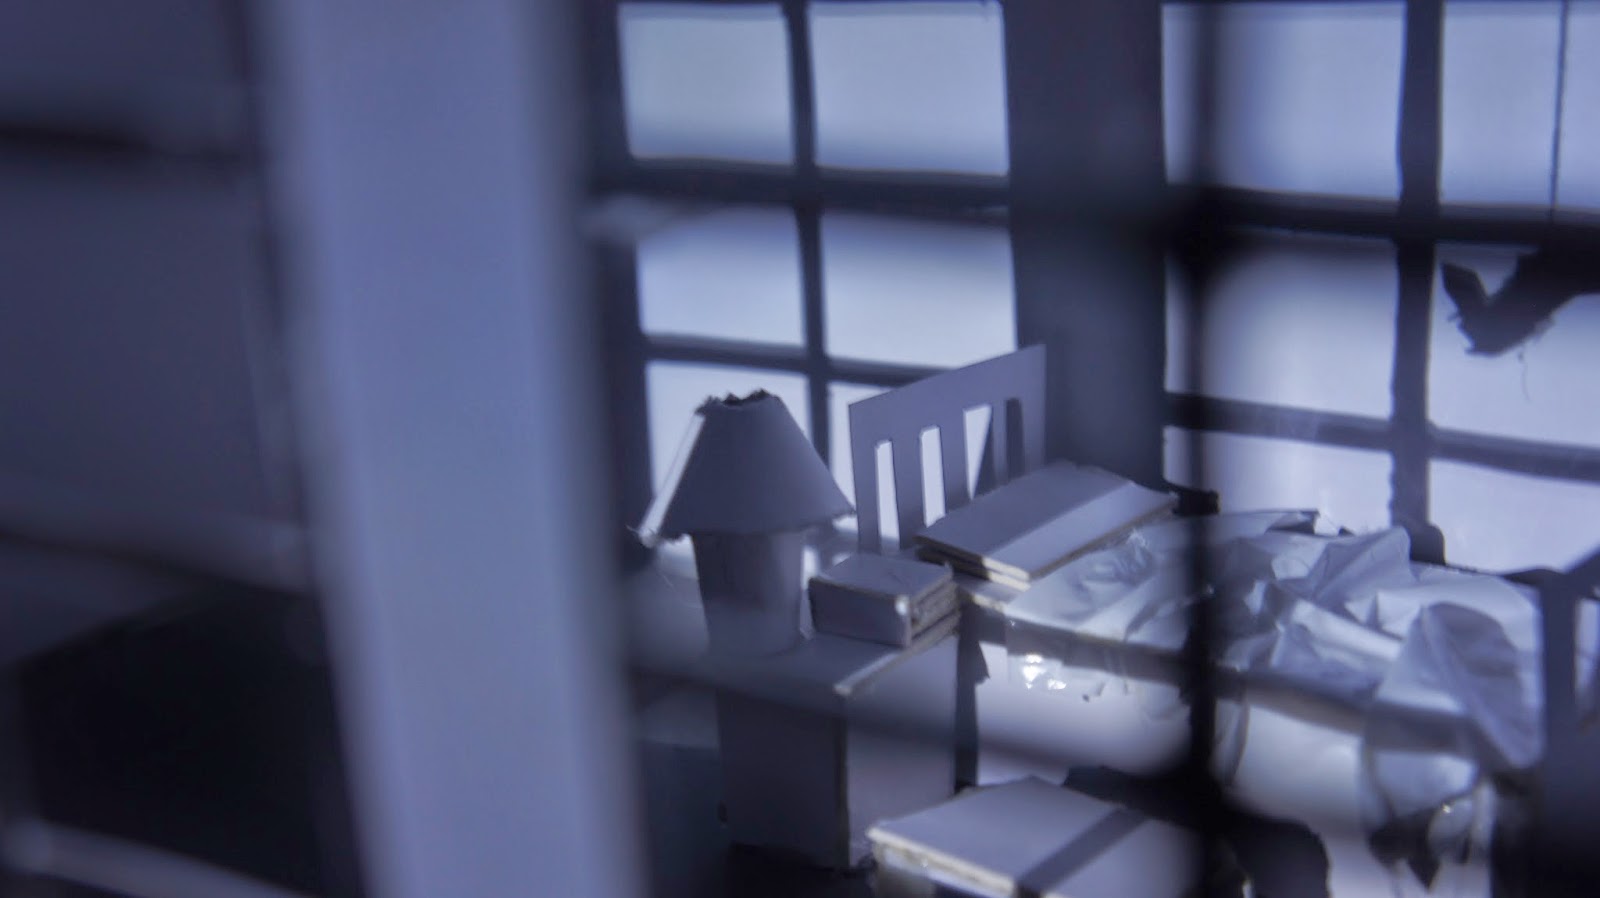
It was around about this time when we made our cardboard model of the room; this helped us thoroughly when looking into how to light the scene in UE4. To create the model we used a couple blueprints made from the block out mesh and printed. We then started to cut and glue card together to create the room and the assets inside it. 

We then imported all the assets into UE4 and started to get the lighting to match the original scene. This took an enormous amount of time and caused one of our team members hours of torment. She had to turn off the planes shadow so that it matched the scene and in the end had to fake some of the shadows on the plane due to the lighting in the scene being unrealistic. To try and get the shadows on the plane we had to try and override the light coming from the windows with more lights. The table was easier to fix due to us encasing it in its own light so it wasn't effected by the hash shadow of the window frame.

Here is the finished scene rendered from UE4 with an added film grain and orange tinged filter on the camera:
Our final tri count was 8,414 with 1x1024, 3x512 and 2x256 textures.

Overall all I am very proud of our group to complete something to this standard in 2 weeks without having much knowledge on PBR textures or UE4. I feel that there is a lot to improve on in this room but for the time that we had I believe it is an impressive scene.

If I were to spend more time on this project I would make the walls and floor texture higher resolution due to being pixelated; this also stands out a lot due to everything else being good quality. However I would mainly work on stretch goals that I wasn't able to complete such as; animating the plane so it sways in the wind and dust particle effects to give the room more atmosphere. 

I have learnt a lot in this project and I am super excited about the next project which is a designing based project; In which we have to design and model a sentry turret. More to come on that; get pumped because spoilers... two words "The Catling Gun"...


19/10/2014

Recreating Marv's room in Sin City:Film Project

So a week has passed and we are getting closer to finishing our group film room project. We did another presentation on Thursday in which we got lots of good feedback and told we were on track and that they were looking forward to seeing the final thing. 

We have all finished our modelling and unwrapping and on our way to finishing texturing. I had a few problems when modelling the plane to say the least and ended up restarting using more references of the same type of plane (Corsair). This turned out so much better, the perspective in the film is still a little off so I had to warp the plane a bit but overall it looks perfect.
Plane iteration (Original on the left. New finished one on the right.)

Plane Reference
Here's the final models in situé;
3DS Max render
Personally I am really proud of our group because we have managed so far to keep on track and produce something that looks accurate to the picture. we have also done a quick lighting test in 3DS Max whilst one of our group member's is looking in more detail at the lighting in UE4. We should have everything in a UE4 scene by Monday ready to start polishing and working on lighting to make it spot on to the original image. 
Test lighting in 3DS Max
Our group has also finished our 3D card model and did a photo-shoot on Friday, so some better photos should be on the way but here is the finished thing with some basic lighting and camera work.


We used thick card for the outer walls and glued them together and then made the individual objects with a thinner card. We also used a template drawn in Photoshop and then printed it out to create the windows and to make sure all of the objects were placed in the correct area.

Enough about the film project lets talk about cool shit :D So this week we were told about 10 different places we should look at to get inspired; lots of websites like Pinterest and so on were mentioned but I have learnt a load of new places to look at and I'm looking forward to going back to London at Christmas to look at some qwerky museums. One big thing that stuck in my head was travelling and I am definitely going to go backpacking around asia when I have the time and money because it is such an awe inspiring place and it does truly inspire me already. 
Colourful rock formations in Zhangye, China


References:
Plane picture: http://en.wikipedia.org/wiki/Vought_F4U_Corsair
Colour rock formations picture: http://masspictures.net/zhangye-china-rock-formations/

11/10/2014

Assets, films, cool shit and awesome stuff to come!


So another week is gone and work is going well, to start off lets take a look at the finished asset project from the first week back at uni;
Overall I am super happy with how the scene came out, due to it being the first group project and the first time using PBR textures and UE4. We had a few troubles with light maps which meant that we were behind schedule on hand in day but we still managed to get it all finished and submitted in time. I also managed to make my axe which I mentioned last time. 

The axe came out amazingly well considering that I concepted and modelled it in a day; I'm also impressed with myself due to my concept, it was the first time I had used the lasso and the pen tool in Photoshop to create concepts and my first time photo bashing. I'm going to keep on using this technique to create concepts. I also passed this model onto three of the other people in my group and they created the textures; I am very impressed with the outcome because it was fairly last minute.

So we had another presentation we had to do about the film project and our tutors helped us narrow down which scenes to go for and we decided to go with a scene from Sin City; Our group went through the entire film and chose shots that stood out to us, I then narrowed them down bit by bit; analysing them as I went and we finally came to the agreement that one of the bedroom scenes was the most visually appealing and interesting. 
All of the scenes we had chosen, narrowed down to 6 potential shots.
The 6 scenes analysed and then narrowed down to 2.
The 2 final remaining scenes with pros and cons.
The final scene chosen.
We also created a timetable on my wipe-board and allocated everyone different assignments; for example I am modelling and unwrapping the plane and boots, texturing the boots and we are all working on texturing the bed and working on the lighting and the engine together. 
Wipe-board chart, list and timetable.
So enough of the boring stuff lets talk about COOL SHIT! My course has just started a sort of seminar/lecture group called cool shit Wednesdays (It surprisingly lives up to its name). 
Last week was trippy as hell we had epileptic seizures all over the place with animated gifs and flashy movies involving ultra Jesus (don't ask I'm trying to erase it from my memory) and this week we had a toned down version where we were shown lots of cool things that one of our tutors had worked on. There has been so much cool shit that I have become so inspired; I even started my own pinterest board of FMP inspirations (http://www.pinterest.com/ajamieson0219/fmp-inspirations/) which I will be updating continuously with all the amazing colourful stuff! 
Me and my flatmate James (http://jmbroderick.blogspot.co.uk/) have also decided to fill the walls of his room with awesome inspirational images (seeing that I pretty much live on his sofa most of the time), we also bought two wipe-boards to write down all of the best ideas in the world on and we are thinking about starting our own projects; by which I mean MAKING OUR OWN GAMES!!... but keep it hush there is more of that coming soon ;) ... hopefully

References:
Cat gif : http://www.pinterest.com/pin/573364596283255127/

05/10/2014

You have gained the skill 'GRIT' +100xp

After a very long summer I am back at uni, it's only been the first week but it feels like I've been here for a month. I did a few things over summer mainly just sketches at parks, some sewing and a ton of baking but I did do something semi interesting; I was asked to go back to my old college and do a 3 day course and take a test so that I would have a certificate to show that I can use Autodesk Maya professionally. I managed to pass considering I hadn't used the program for a year since switching over to 3ds max but never the less I'm super proud of myself and happy that I have a new thing to put on my CV.
Sketch at Crystal Palace park
Mini Makar plushie
Chocolate Orange cake
 Maya certificate

So my first week back has been stressful but exciting and I am looking forward to all the new awesome projects on the way. Our first project was a group 3D task in which we have to swap around different objects to complete them; for example I concepted a bench then modelled a hog, unwrapped a shield and textured a barrel, We then all put these assets into unreal engine 4 which is an amazing step up from UDK. We also had to learn PBR texturing which at first was confusing but it makes your objects look so beautiful in the end and is well worth learning. I will upload some pictures of that next week because we still have a few things to sort out including light-maps and learning how to render from a camera in UE4. I am also going to try and model another asset for the scene and hopefully have it finished before hand-in. Our group has worked excellent together and I have taught alot of the group the best way of modelling, unwrapping and texturing, we have also realised that for future projects it is wise to set up a Google drive straight away and have a naming convention so that it is easy to manage. I also found myself helping another student by teaching her the best way to model the bench she had been given and was struggling with; I managed to make it within 20 minutes and bang on the limit of 300 tris; this helped her immensely, I always need the extra practice anyway.

One of my mood boards for the film room project
The other project we have been set is a film room project; this is where things started to get stressful. At the beginning of the week we were set this project being told that we could choose any room we wanted from any film and that we were allowed to alter it to make it our own. So after getting into groups we made lots of mood boards looking at how we could improve potential scenes. We finally settled on the bathing quarters in spirited away, thinking that we could add in new interesting lighting, learn how to animate water and steam in UE4 and thus making a realistic interpretation. Unfortunately in our critical studies seminar we were told that everything we wanted to do we could not and that what we were told was wrong. I got fairly emotional during this seminar and had to go calm down, after coming back into the room is started to focus on what exactly the teachers wanted us to do. So I took notes and sprung back from this unfortunate situation and I am looking into lots of new films that i haven't seen but love the look of, lots of black and white films with intense contrast; I am trying my hardest on this project and I will keep on going even though I was knocked down at the start. I have gained 'GRIT' something our lectures always tell us we need to have; to be able to bounce back and carry on and that is exactly what I am going to do.